Jan 24

So this was a challenge–I wanted to eliminate the X10 remote and disable X10 on my INSTEON switches for the home theater.  In doing so I wanted to use the INSTEON IRLinc to convert IR signals to INSTEON.  This would allow me complete control via my Logitech Harmony Remote.

I hooked up the IRLinc and paired up my devices to Scenes A/B and everything worked fine with the IRLinc credit card remote.  To get the Harmony setup I had to add custom commands for Scene A on/off (Screen Up/Down) and Scene B on/off (Wall Scones on/off).  These had to be learned on the Harmony using the IRLinc remote when I was done I quickly discovered control from the Harmony was very unreliable.  I toyed with this for a few days on and off and eventually got fed up and tossed it in a drawer to forget about.

Last night Ken was over and I decided to have two minds look at it 😛 I knew it should work, and with a fresh pair of eyes we got it working.  We hooked it up and everything worked properly–I had previously added the INSTEON switches to the IRLinc’s scenes and it had retained those settings.  Testing it with the IRLinc’s credit card remote everything worked fine (as before) but with control via Harmony was very unreliable just as before.  We tried relearning the IR signals and that wasn’t getting us anywhere while sitting there staring at the screen we saw the “Custom” button on the IR Learn page in the Harmony software.  When we hit that we saw that all our learned commands had “Analyzed” next to them so we hit the new Learn Raw button that appeared once we hit the Custom button.  The learning process was a lot faster and we quickly updated the remote to test.  Success!  We learned that the Harmony doesn’t replicate IR codes it learns exactly.  By default the remote analyzes the IR signal and fixes any issues or interferance it encounters (sunlight in the room for example has IR light).  When the Harmony analyzed  the IRLinc’s signal it would clean the signal so much to the point that the IRLinc wasn’t able to respond because it wasn’t receiving the proper IR signal.  Hopefully this post helps others who have IRLinc’s in drawers from failed integration with Harmony remotes.

We mounted the IRLinc’s receiver on the front of my A/V receiver since I have no spare IR Emitters.  I don’t think I’ll even pickup another IR emitter for this since it’s always behind a closed door.

To get the Harmony setup I had to add custom commands for Scene A on/off (Screen Up/Down) and Scene B on/off (Wall Scones on/off).  These had to be learned via the Harmony for it to work and once learned they never worked properly.
Nov 14

I was out of outlets so and saw an APC A/V power conditioner for super cheap–it has 10 or 12 outlets.  While I was swapping out the old strip (6 outlets) for this one I cleaned up the cables some–yes this is much much better then before.  I’ve got 0 outlets to spare.  I may have to add a second duplex outlet on the wall to accommodate my IR to Insteon device, it has a pass-through plug but I don’t trust running much through it and it takes up an entire duplex outlet–due to the APC conditioner using a low profile plug….

Power Cables:

  • Power Bridge (Feeds PJ and TV)
  • Receiver
  • DVD Player
  • Blu-Ray Player
  • Cable Box
  • Wii
  • Xbox 360
  • 2 Wiimote Chargers
  • HDMI Splitter
  • IR Connecting Block
  • Harmony Remote Charger
  • Cordless Phone Charger
  • 2 Lamps

I know it needs more work, I plan to bundle up the speaker cables, but other then that there are only a couple of other things I can think of doing to improve this.  All the power cables are bundled near the back of the respective component already…

Oct 22
Home Theater Part 6.5
icon1 Michael Requeny | icon2 Uncatagorized | icon4 10 22nd, 2009| icon3No Comments »

Just picked up a Blu-Ray player on sale @ Amazon (Panasonic DMP-BD60) and now not having an HDMI capable receiver is starting to suck.  Swapping cables between Xbox, Bluray and Cable for the PJ really blows.  Looking at some Onkyos but can’t make up my mind.   Having to take into account our Zone 2 audio (patio) makes it a bit more difficult.  The receivers I’m looking at have a limitation of only being able to send non-HDCP audio to Zone 2–therefore I will have to retain an older DVD player for this…going to be running out of room in the media cabinet quickly now.

Jul 2
Home Theater Part Six
icon1 Michael Requeny | icon2 Uncatagorized | icon4 07 2nd, 2009| icon3No Comments »

PJ Mounted now–
The mount sucks, some cheap junk from flea-bay, having mounted so many projectors in the past using real mounts (using peerless, chief and premier mounts) I should have known better then to use this crap.  It has a ball & socket so you can adjust XYZ, however they all adjust at the same time…mounts by real manufactures have separated the various  XYZ adjustments. I wont’ make the mistake of using a junk mount again…Took me some 15-20min to get it squared away and it’s still slightly off.  I made my own grommet out of some fire retardant nomex, mainly to stop attic debris from falling onto it, and also as a possible fire-stop.  This pic was taken after it had been mounted for awhile, ignore the dirtiness.

Controls–
Harmony 880 for IR, and temporarily using X10 remote for controlling Screen/Sconces.  Can’t wait to get the Insteon to IR stuff setup so I can chuck the X10 controls…

Jun 30
Home Theater Part Five
icon1 Michael Requeny | icon2 Uncatagorized | icon4 06 30th, 2009| icon3No Comments »

Prepared the INSTEON controls and PJ outlet for the attic.  Also mounted the relay board up in the attic and wired it all up.  Sconces are wired into this as well, programmed them so they ramp up/down.  Made a macro on my USB programmable INSTEON controller so whenever the screen goes up the Sconces ramp on, and when the screen goes down they ramp off.

TV is all wired up and center channel & sub RCA cabling is done.  TV wires look all gummy because the cheap electrical tape that wrapped around the plastic protecting all the connectors and binding the cables together left all the adhesive behind…and I pulled it off early so some insulation came in contact with it.  Will clean it up later on.

Clean speaker wire installs all done.  The mounts I used for the speakers suck–cheap plastic junk, no covers for the screws, ugly as hell… The cool part is I used a very handy tool from LSD (Labor Saving Devices) called a “Wet Noodle”  it’s a flexible bit of thin stiff tubing with a magnet on each end.  It comes with some ball chain attached to a split ring.  The way it works is from the attic you drill a hole through the top plate of the wall frame and drop the ball chain in the hole (split ring prevents the end from falling into the hole) and then drill a hole in the wall where you want to bring the wire out, and you retrieve it using by inserting the Wet Noodle and catching the ball chain on the magnetic tip affix your wire or poly and go back in the attic and pull the ball chain out and you got your wire through.  I was able to drill holes just a bit bigger then the gauge of the speaker wire and pull the speaker wire through using this tool/technique.  Well worth the 22 bucks, will definitely come in handy again.

IR connecting block installed and IR Receiver too.  Receiver went in the vaulted ceiling area since the screen being down would block it’s placement elsewhere.  Doing this again I wouldn’t use an inwall connecting block, it just added more wires traveling from the wall to the media cabinet, had I used the non-in wall version I would simply have a Cat5 cable coming across and that would be it.  This way I have 3 emitter cables traveling across, along with a power cable.

Wired in the HDMI and Component splitters to get output for both TV and PJ.  Super Cheap HDMI splitter, so far no issues.  Component picture really suffers on the PJ pretty sure I need to get a better VGA to component cable.

Jun 28
Home Theater Part IV
icon1 Michael Requeny | icon2 Uncatagorized | icon4 06 28th, 2009| icon3No Comments »

TV Mounting time!  Only one problem…the 52″ TV if centered on the wall is only going to hit 1 stud when we mount.  No good–quick search online led to a blocking method we could use.  This move about killed the parentals!

Test fitting the bracket, it was very solid.  We quickly realized we made a big mistake though.  We should have saved the drywall we cut out to throw over this, because we didn’t we had to put another layer of plywood over to make everything flush with the surrounding drywall.  Then lots of mud and paint.  This was the only part of the project that sucked.  Knowing we screwed up this bad and not really having a way to fix it easily.  In the end it looks pretty damn good and you have to look very hard behind the TV with a bright light to see the imperfections of our screw up.  Quickly made a few more cuts for the power bridge and the LV mudring and ran the cables the rest of the way.

We tossed the TV up and it looks great (it’s mounted so high up because we have a fake fire place that goes under it)  You can also see how we capped the drywall on the ceiling where the projector screen cuts were made.

Jun 25
Home Theater Part III
icon1 Michael Requeny | icon2 Uncatagorized | icon4 06 25th, 2009| icon3No Comments »

Cut the screen opening, I did the first cut my brother did the 2nd.

All done!  We tossed the screen up in the attic and ran some temporary power to test it out that night…Woah was that motivation to get it done!  Learned very quickly that I need to tweak the limit switches quite a bit–way off.

I couldn’t access the limit switches anymore–I had to make a slice in the ceiling to get at them, not a big deal, it’s an easy patch.  I also pulled the wires through and left them directly above in the attic where the TV was going to mount.

Jun 21
Home Theater Part Duex
icon1 Michael Requeny | icon2 Uncatagorized | icon4 06 21st, 2009| icon3No Comments »

More progress–Paint and Wall Sconces all done.

Some more decisions made, Harmony 880 will control the entire system.  Xantech Connecting block & Emitters for IR distribution, Samsung 52″ LCD selected.  Receiver + Speakers will be my dad’s existing gear.

To control the motorized screen and wall sconces INSTEON was selected.  I was going to get the low voltage board for the motorized screen so I could control it via IR, RS-232, etc. but those options all would have cost me over $300.  My electrician buddy Kenneth “Teh Fuckin’ Man” Deli figured out a way to use INSTEON Controls, and a Relay to control the screen.  He also advised me on an IR to INSTEON adapter so my Harmony remote could control everything properly.  Did I mention I <3 DIN Rail???

Screen Testing!  Also set the limit switches were I think they should be…
Installed half the power bridge and cut in the LV mudring.

Setup my ghetto cable pulling rig–Since only one of the cable is on a spool this isn’t straight forward, but most of the cable is very stiff so it spins easily.  Still needed someone tending to this while the pull was going on but it made it a breeze running all the cables at one time.  I didn’t have any poly to use as a leader, so I used a bit of phone wire and staggered all the cable’s connectors so the pull wouldn’t just be a big ass ball of connectors.  Everything is neatly tied up and all connectors are protected as described in the previous post.

Jun 13
Home Theater Build Part 1
icon1 Michael Requeny | icon2 Uncatagorized | icon4 06 13th, 2009| icon32 Comments »

When I was younger my parents would take me and my brother out every few weekends to look at model homes.  Me and my brother were always fascinated with dedicated home theater rooms.  My dad always talked about how cool that would be–for his birthday this year we were able to make it happen.

So first it started with they were going to buy a new TV–52″ LCD.  We (my brother and I) convinced them to mount it on the wall.  After that we convinced them to mount all the surround speakers on the wall.  After much talk we got them to agree to have a dual display system–TV & Projector (PJ).  I had a huge motorized screen in the attic a friend of mine got me from his old office building that was being demolished.  We got them to agree to mount this motorized screen on the wall.  Then we took it up a notch and got them to agree to mount it in the attic–hidden screen woohoo.  Somewhere along all this we got them to agree to the components being behind in a media cabinet (IR Distro woohoo).  There were trade offs for getting what we wanted–having to paint the whole @%$% room.  Install and light some wall sconces and a ceiling fan…

I decided to run every possible cable to TV and just DVI (adapted to HDMI) and VGA (adapted to component) to the PJ.  I also ran 3.5mm audio cable for an IR Emitter on the PJ.

Cables:

  • x2 HDMI to TV
  • 1 Component to TV
  • 1 Composite to TV
  • 1 S-Video to TV
  • 1 Cat5 to TV (Network)
  • 1 Cat5 for IR Receiver
  • 5 Speaker Wires
  • 1 Coaxial (terminated with RCA connectors) for Sub
  • 1 HDMI to PJ (DVI->HDMI Adapter)
  • 1 VGA to PJ (VGA->Component)
  • 2 Romex for Power Bridge & PJ outlet

I had to decide how to terminate the cable–do I run them all onto wall plate jacks–that would be one big ass wall plate.  I got a passthrough/spillout plate–I wrapped the connector ends in stretchy sticky plastic so they wouldn’t get gummed up in the insulation in the attic.  Many people say to run some smurf tube from your PJ and TV to your media cabinet but in my case I didn’t feel it was necessary because I ran every possible cable for my TV and PJ.  Also the attic is easily accessible and easy to work in so I can always add something else.

Mar 1
7.1 Receiver
icon1 Michael Requeny | icon2 Uncatagorized | icon4 03 1st, 2008| icon3No Comments »

So I just got a JVC RX-D301 7.1 Receiver off woot a few days ago for like ~$105

Panasonic Receiver

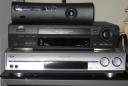
So far I’m impressed–it outperforms the Sony receiver we have that is 3x the size and about a year and a half old. I’ve only got 5 speakers hooked up so far but hell there isn’t any 7.1 dvds yet anyway…cool feature is a little usb soundcard it comes with to send audio from a computer to it wirelessly, l33t. Also has a USB-B jack on the front to plug it directly into a computer to work as a soundcard

Front L/F and Surround L/F Speakers are Cambridge SoundWorks THX something or other.

Surrounds

Surrounds
Center is some POS Panasonic I took off my brother’s 5.1 system