Dec 29

Dell introduced this plugin awhile back, it’s actually a Virtual Appliance you import into vCenter.  The plugin inside vCenter is actually an Adobe Flex (Flash-based) app that gets embedded into your vSphere Client, so ensure you have Flash installed on the machine(s) you wish to use this plugin from.

Overview of Features

  • Update BIOS/Firmware on Dell ESXi hosts from vCenter
  • Checks for updates automatically and alerts you when there are updates available
  • Can leverage an established Dell Repository to avoid data duplication–if you are a heavy Dell shop you should know what this is
  • New vCenter Alarms for Dell Hardware
    • These Alarms can even trigger hosts to go into maintence mode to evacuate VMs from that particular host if the hardware event is critical (in a DRS enabled cluster of course)
  • Supports Dell’s Proactive Systems Management
    • Works without (the God-awful) SilverStreak to automatically create support cases with Dell when issues arise
  • View Warranty information of your Dell hosts
    • Allows you to configure a proxy, if your environment requires one
  • Bare metal deployment of ESX/ESXi servers
    • This leverages Dell Lifecycle Controllers and iDRACs to provision Dell servers somewhat auto-magically.
    • First you create a Hardware Profile from a Reference Server–(configures boot order, BIOS settings, iDRAC settings, RAID config)
    • Then you create a Hypervisor profile–You point at an ISO, and configure the vCenter, destination container (data center or cluster), and even a host profile for you enterprise plus users.
    • Note you can “white-list” service tags so only those hosts you define can be used by the plugin to deploy against.
  • OSMA Launcher
    • So you can launch directly to your OSMA web console to connect to an OSMA agent on an ESXi host
  • Appliance Upgradable
    • Does not require replacement by deploying a new OVF when a new version comes out
    Read the rest of this entry »

    Dec 24

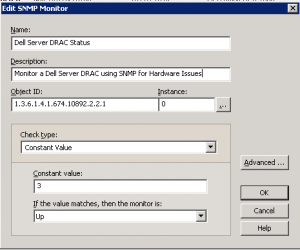
    WhatsUp v14 added some nice new active monitors to monitor fans, power supply and temperature for Dell Servers.  However that doesn’t cover everything else, Memory, CPU, Chassis Intrusion, HDD, RAID Controllers, etc.  We found the simplest way was to simply monitor for the LCD color of the Dell server.  Yes, we are sure the OID that we are looking at isn’t actually LCD color, but we like to think that it is.  The OID is actually for drsGlobalSystemStatus–which if it’s not 3, then there is a problem and the LCD is amber to reflect that.  Below is how you can setup this active monitor for WhatsUp:

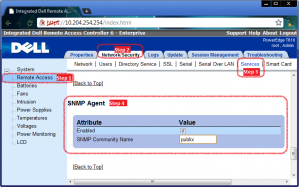
    First you need to configure SNMP on your DRAC, this screenshot shows the steps:

    Once you have SNMP configured on your DRAC you can setup the SNMP Active monitor in WhatsUp as follows:

    Nov 20

    So you decided to take the plunge and buy the Dell Management Center vCenter Plugin but it’s not registering with your vCenter?  In my case, the virtual appliance spit out all kinds of errors–SSL errors, unknown errors, timeouts…
    Well, the fix for me was simple–apparently Dell doesn’t make the latest version avaliable online, you may have downloaded an older version from Dell’s site and Dell expects you to simply update the appliance online after you deploy it.
    To do this:

    1. Login to the appliance admin portal with your previously set admin password (https://[ApplianceIP]/DellAdminPortal/index.html)
    2. Now navigate to Appliance Management on the left column
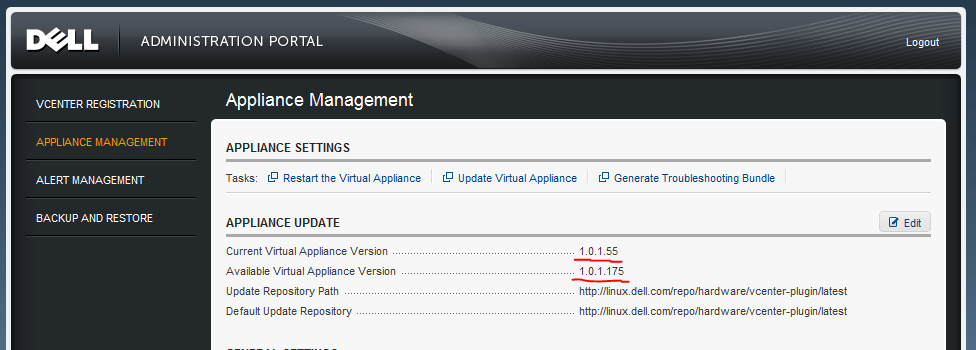
    3. On this page you’ll see 2 lines near the top: Current Virtual Appliance Version and Available Virtual Appliance Version, if the Available version is higher then the current, click Update Virtual Appliance to install the update

    4. It takes about 5-10min to complete, the virtual appliance will reboot at some point, once you get a login screen at the console it should be ready to proceed
    5. Go back to the appliance URL in your web browser and login (https://[ApplianceIP]/DellAdminPortal/index.html)
    6. From here you’ll see a link to register with vCenter near the top–click that
      1. Enter the IP or Hostname for your vCenter server
      2. Provide User Credentials with admin access in vCenter & hit register
    7. Once registration is complete you will get a message to relaunch a vSphere Client and connect  to the vCenter to access the plugin, so do that and go about configuring the rest of the plugin.