Dec 5

I guess the guys behind vCO missed including this workflow in the default install–(hey they had to miss one after making so many hundreds–right?)

Simple little workflow, thought I’d post it up to save anyone the trouble of recreating…


[download id=”1″]

Dec 4
vCenter Orchestrator Setup
icon1 Michael Requeny | icon2 Orchestrator, VMware | icon4 12 4th, 2011| icon3No Comments »

Prerequisites:

  • Licensed vCenter Server – This can be an evaluation license
  • Service Account to perform LDAP Lookups (vco-service is used below)
  • Active Directory Security Group for vCenter Orchestrator Admins (vCOAdmins is used below)
  • Microsoft SQL Database (vco is used below)
  • Credentials for an account with access to above Microsoft SQL Database
  • Service Account that is a member of the vCenter Orchestrator Admins Group (vCOAdmins group, vco-service is used below) – yes this can be the same account as your LDAP lookup account

Installation Guide:

  1. Start Service
  2. Navigate to IP:8282
  3. Login with user vmware password vmware
  4. Select Network on the left
    1. Select IP address to bind to
    2. Confirm rest of settings on page (adjust ports if any conflict with other software on the orchestrator host)
    3. Click Apply changes at the bottom right
    4. Network should now have a green bubble next to it, proceed
  5. Select LDAP on the left
    1. Select Active Directory from the dropdown if it’s not already selected
    2. Enter your primary & secondary LDAP hosts (domain controllers) note: secondary is optional
    3. Enter your LDAP root path, if your domain is requeny.lan enter: dc=requeny,dc=lan
    4. For username enter user@domain ex: vco-service@requeny.lan
    5. Password- this should be obvious
    6. Enter your User lookup base path: (where all your users are located, ex: cn=Users,dc=requeny,dc=lan (this would point to the Users OU in active directory)
    7. Enter your Group lookup base path: (where all your groups are located, ex: cn=Users,dc=requeny,dc=lan (this would point to the Users OU in active directory)
    8. Enter the path to your vCO Admins Group, ex: cn=vCOAdmins,cn=Users,dc=requeny,dc=lan
    9. Hit apply changes, if all your settings are correct LDAP should now have a green bubble next to it, but before continuing click the Test Login tab at the top and attempt to login with a user in the vCOAdmins group
    10. If that test login worked, proceed on
  6. Select Database on the left
    1. Select SQLServer from the dropdown
    2. Enter the username for SQL database (note, don’t prefix with domain, or use use@domain format here, just the username)
    3. Password – this should be obvious
    4. Database host IP address or DNS name – hostname of SQL server ex: sql01
    5. Port: 1433 – MSSQL default, change it if your SQL server isn’t listening on the default port
    6. Database name: this is the name of the database that has been created on your SQL server ex: vco
    7. Instance name: whatever your instance name is, ex: sqlexpress
    8. Domain: your AD domain here, use the NetBIOS name here, ex: requeny
    9. Hit apply changes, if all your settings are correct you will get an error under Validation results that says: Database connection successful.  No schema found.  Please initialize database.  What this means is your connection worked, however there are no tables in the database.
    10. At the top you should see a new link Install the database, click that (this should only take a couple of seconds)
    11. You should now have a green bubble next to Database, proceed on
  7. Select Server Certificate
    1. If you don’t have a certificate CA, select Create certificate database and self-signed server certificate
      1. Enter what your info in the next few boxes, examples below:
      2. Common name: orchestrator
      3. Organization: requeny
      4. Organizational Unit: basement
      5. Country: US
      6. Click Create at the bottom right
      7. Server Certificate on the left should now have a green bubble next to it, proceed onto step 8 below
    2. If you do have a certificate CA, you can follow my other post on what to do if you use Microsoft Active Directory: Certificate Services
      1. Once server certificate has a green bubble next to it, proceed onto step 8 below
  8. Select Licenses
    1. You can either enter a vCenter Server license manually, or Orchestrator can connect to your vCenter Server and read the license on it’s own.
    2. To connect to a vCenter Server and read the license:
      1. Check the use vCenter Server license radio button
      2. Enter the hostname of your vCenter Server
      3. Enter the port of your vCenter Server Web Services (443 by default)
      4. Path: leave default
      5. Enter username & password of an account that can read license data from vcenter
      6. Click submit
      7. If you receive an error about ‘SSL certificate is missing for this host read my other post on fixing this SSL error
      8. Licenses should now have a green bubble next to it, proceed
    3. To manually enter a vCenter Server license
      1. Check the Add vCenter Server license manually radio button
      2. Enter your vCenter Server serial number (remember you must enter a standard edition serial, foundation doesn’t include Orchestrator)
      3. Enter the name of your License owner
      4. Click apply changes on the bottom right
      5. Licenses should now have a green bubble next to it, proceed
  9. Select Plug-ins (yes we skip Startup Options for now)
    1. Enter credentials for a user in the vCO Admin group
    2. Username ex: vco-service
    3. Password – this should be obvious
    4. Click Apply changes at the bottom right
    5. Plug-ins should have a green bubble next to it, as well as Startup Options at this point
    6. Check the plugins you want to enable/install.  Leave the defaults and ensure vCO WebOperator & vCenter Server are checked, then hit apply changes again
    7. You’ll notice the status next to many of the plugins is: Will perform installation at next server startup.
  10. Select Startup Options
    1. Click Install vCO server as service (This will install the Windows Service for vCenter Orchestrator)
    2. Now click on Start Service to startup vCenter Orchestrator (vCenter Orchestrator typically takes upwards of 30 seconds to start, you can use the refresh link to check the status)
    3. If you have any problems starting the service, click on Log on the left, and set the logging drop down to All then click Apply changes on the bottom right, go back and start the service again and then check the log for any errors
  11. Open the vCenter Orchestrator Client from the Start-Menu and login!
    1. Don’t forget to use your domain login DOMAIN\username
    2. Don’t forget to be a member of the VCOAdmins group so you can login.
    3. If you want to install the client elsewhere use the installer in the vCenter Server ISO @ vCenter-Server\vCO\vCenterOrchestrator.exe
Nov 27

Here you are trying to setup vCenter Orchestrator and you get this error: SSL exception, ‘SSL certificate is missing for this host’

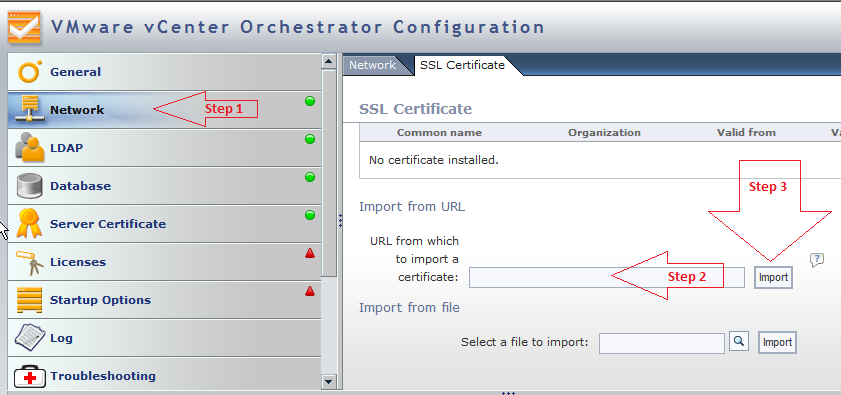
What vCenter Orchestrator is saying is that it doesn’t have the certificate installed for that host, unlike other apps/programs, Orchestrator doesn’t offer an option automatically install these certificates upon inital connection.  You have to first add the certs then connect to the host, to do this: (refer the screenshot at the bottom if your stuck)

  1. Login to your vCenter Orchestrator Configuration Webpage: (http://vCenter-Orchestrator-Hostname:8282) – default user/pass is vmware/vmware
  2. Select Network from the left column
  3. At the top you’ll see a tab for SSL Certificate, click that
  4. You can either import the SSL certificate from a file, or from a URL–URL is the easiest as you just enter the hostname and Orchestrator installs the certificate
  5. In the URL box, just enter your vCenter hostname, then click Import to the right of that text box
  6. You’ll see the certificate details displayed if everything looks alright click Import at the bottom
  7. Repeat this process for each vCenter you plan to use Orchestrator with
  8. Go back to whatever step you were trying to do when you got the error: SSL exception, ‘SSL certificate is missing for this host’ and try it again, this time it should work successfully
Nov 25

So it’s been awhile since my last post on Building a Cost-Effective vSphere ESXi 5.0 Home Lab–I have been playing with this system now for a few weeks and am loving it–I’ve ordered parts for a 2nd system and might spring for a 3rd…Remember that the chip on this motherboard supports AMD-V, so you can do practicably everything except for VMDirectPath I/O with this system.

I’ve been running upwards of 7 VMs on it at once and have had no real problems.  Yes ready times can get high, but I’ve never had them over 30% under that kind of load.  Again this is a home lab, and somewhat high ready times don’t effect anything except a couple extra seconds here or there when I am doing something intensive.

This little box rocks for a home lab, the key thing to remember is that it IS a home lab–run everything with 1vCPU and minimal amounts of ram assigned.  (I don’t have a single VM over 1Gb of RAM assigned).  The biggest slow down in my experience with this system comes from swapping on local storage–not CPU contention.  (I haven’t connected this to my OpenFiler box yet)  Read the rest of this entry »

Nov 23
Location of VMware log files
icon1 Michael Requeny | icon2 VMware | icon4 11 23rd, 2011| icon3No Comments »

Having problems?  You should check the logs for anything obvious–

vCenter Server:

  • Windows Server 2003 and earlier - %ALLUSERSPROFILE%\Application Data\VMware\VMware VirtualCenter\Logs\
  • Windows 2008 and later - %ALLUSERSPROFILE%\VMware\VMware VirtualCenter\Logs\
  • Linux vCenter Server 5.0 Virtual Appliance  – /var/log/vmware/vpx

ESXi Hosts (v3.5 – v5.x):

  • /var/log/messages – VMkernel – Devices, drivers, VM stuff, as well as hostd and vpx logs
  • /var/log/vmware/hostd.log – Host service stuff – Host & VMs Tasks & Events, vSphere Client stuff, vCenter Agent (vpxa) and SDK stuff
  • /var/log/boot-logs/sysboot.log – More VMkernel startup including modules and other boot bits
  • /var/log/vmware/vpx/vpxa.log – vCenter (vpxa) agent logs & hostd logs
  • /var/log/vmware/fdm/* – HA Logs – vCenter 5.0 and later
  • /var/log/vmware/aam/* – HA Logs – vCenter 4.1 and older

ESX Hosts: (v3.x and v4.x):

  • /var/log/messages – Service Console Kernel – Services stuff will be here
  • /var/log/vmkernel – VMkernel – Devices, drivers, VM stuff
  • /var/log/vmkwarning – VMkernel Warning messages — these should also be in the vmkernel log file
  • /var/log/vmksummary – Host startup/shutdown stuff, hourly log output showing uptime, # of VMs running, service console resource usage
  • /var/log/vmware/hostd.log – Host service stuff – Host & VMs Tasks & Events, vSphere Client stuff, vCenter Agent (vpxa) and SDK stuff
  • /var/log/boot-logs/sysboot.log – More VMkernel startup including modules and other boot bits
  • /var/log/vmkiscsid.log – Logs for the Software iSCSI Client
  • /var/log/vmware/vpx/vpxa.log – vCenter (vpxa) agent logs & hostd logs
  • /var/log/vmware/fdm/* – HA Logs – vCenter 5.0 and later
  • /var/log/vmware/aam/* – HA Logs – vCenter 4.1 and older
Nov 21

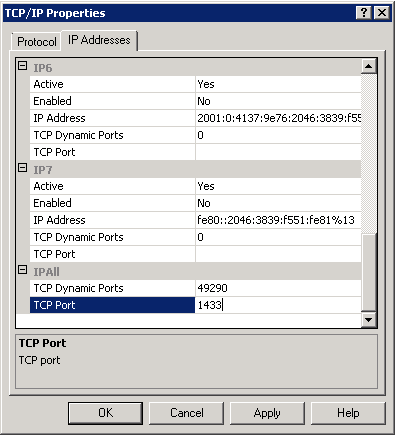
If your trying to configure vCenter Orchestrator to use a local Microsoft SQL Express database and you get the error: Unknown host: Error when connecting to host localhost/127.0.0.1, port 1433: Connection refused: connect

You need to change a few options on your SQLExpress server to accept this connection.

  1. Launch SQL Server Configuration Manager
  2. Navigate to SQL Server Network Configuration->Protocols for SQLEXPRESS on the left column
  3. Double-Click on TCP/IP
  4. Ensure Enabled is set for Yes
  5. Ensure Listen All is set for Yes
  6. Click the IP Addresses Tab
  7. Scroll to the bottom and find IPAll
  8. Set TCP Port to 1433 for IPAll
  9. Hit Ok, and Ok to the dialog box that pops up
  10. Navigate to SQL Server Services on the left column
  11. Right-Click SQL Server (SQLEXPRESS) and select Restart
  12. Try again and your Orchestrator server should be able to connect to the database now
Nov 20

So you decided to take the plunge and buy the Dell Management Center vCenter Plugin but it’s not registering with your vCenter?  In my case, the virtual appliance spit out all kinds of errors–SSL errors, unknown errors, timeouts…
Well, the fix for me was simple–apparently Dell doesn’t make the latest version avaliable online, you may have downloaded an older version from Dell’s site and Dell expects you to simply update the appliance online after you deploy it.
To do this:

  1. Login to the appliance admin portal with your previously set admin password (https://[ApplianceIP]/DellAdminPortal/index.html)
  2. Now navigate to Appliance Management on the left column
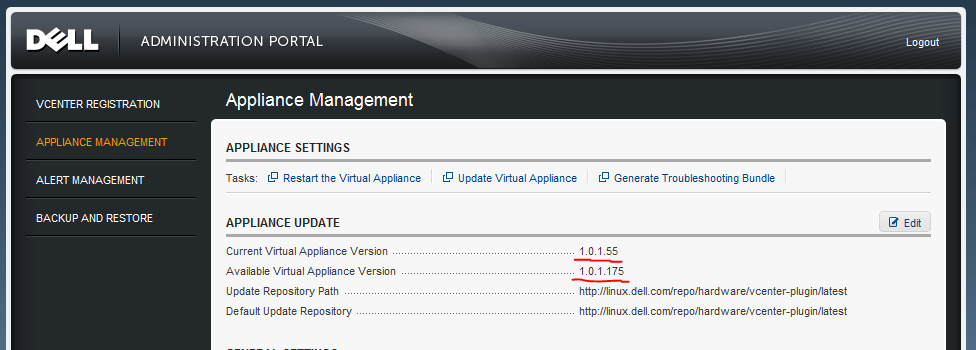
  3. On this page you’ll see 2 lines near the top: Current Virtual Appliance Version and Available Virtual Appliance Version, if the Available version is higher then the current, click Update Virtual Appliance to install the update

  4. It takes about 5-10min to complete, the virtual appliance will reboot at some point, once you get a login screen at the console it should be ready to proceed
  5. Go back to the appliance URL in your web browser and login (https://[ApplianceIP]/DellAdminPortal/index.html)
  6. From here you’ll see a link to register with vCenter near the top–click that
    1. Enter the IP or Hostname for your vCenter server
    2. Provide User Credentials with admin access in vCenter & hit register
  7. Once registration is complete you will get a message to relaunch a vSphere Client and connect  to the vCenter to access the plugin, so do that and go about configuring the rest of the plugin.
Nov 17

This is another updated version with more Intel removal goodness…see my previous post for more information on Automated P2V Cleanup: Remove/Uninstall Dell OpenManage & Broadcom/Intel Drivers Updated so it removes all the new Dell/Intel/Broadcom stuff released since the last update.

This Removes:

  • Dell OpenManage Server Administrator
  • Broadcom Drivers and Management Applications
  • Broadcom NetXtreme II Driver Installer
  • Intel(R) PROSet for Wired Connections
  • Intel(R) PRO Network Connections

Read the rest of this entry »

Nov 6

This post is essentially a +1 for Mike Laverick’s campaign

There is alot of buzz in the VMware Community about VMTN (VMware Technology Network) Subscriptions.   These subscriptions were the equivalent of Microsoft’s TechNet Subscriptions.  The idea is to give IT Professionals licensed copies of “complete” Microsoft software for evaluation, testing and troubleshooting–without a time limit or feature limitations.  Microsoft bundles in some E-Learning and Support Tickets, as well as betas.  VMware had a similar offering a few years back but discontinued it.  Well now the community has banded together to ask VMware to recreate this offering.  It would be very benefitial for VMware to do, I’m sure there are many folks that are using trial software and registering multiple email accounts to get new evaluation keys just to lab something, or evaluate a new solution.  VMware could make some profit by providing a paid subscription to access this software for any IT Professional to learn with.

Microsoft has basically 3 offerings when it comes to this realm:

  • TechNet Subscriptions – Evaluation Licenses with no time limit – $199/yr or $349/yr (renewals cost less) depending on level purchased
  • MSDN Subscriptions – Software Development & Testing licenses  – Varies greatly, from $699-$11,899 depending on level purchased
  • Action Pack Subscriptions – Internal-use licenses (Only for Microsoft Partners) – $299/yr
VMware on the other hand has 2 offerings when it comes to this realm:
  • NFR – Not-for-resale licenses – Training/Demonstration (Only for VMware Partners) – Free, but requires a specific partnership level based on revenue
  • IUL – Internal-use licenses – Discounted Licenses (Only for VMware for Partners) – Costs vary based on license, discounts unknown
So for the average Joe, the only way to get their hands on VMware products for lab is to use the evaluation system on VMware’s website.  This isn’t ideal and IMO hinders many folks from familiarizing themselves with any of VMware’s “Advanced” products.  So VMware, please bring back the VMTN Subscriptions, and please offer the full gamut of products.  I understand that certain products won’t be able to be offered easily without some negiociating (Nexus 1000V comes to mind).  But SRM, Lab Manager, CapacityIQ, vCenter Operations, vCenter Server Heartbeat , vShield Suite, View, vCloud Suite, vFabric Suite, AppSpeed, etc. would empower your users and advocates to learn your products much easier and of course that would lead to faster adoption of these products in many organizations.
If you agree +1 this post on the VMTN Community Forum
Oct 26
P2V Tips
icon1 Michael Requeny | icon2 VMware | icon4 10 26th, 2011| icon3No Comments »

Pre-P2V

  • Cleanup Irrelevant Data
    • Don’t bring over that downloads folder on every server full of drivers, hotfixes, patches, service packs, etc.  Remember storage is now shared among many VMs now, try not to duplicate things like that.
  • Stop transactional services during P2V
    • MSSQL, mySQL, etc.
  • Disable Windows Updates
    • You don’t want your source to reboot due to automatic updates mid-P2V
  • Do not resize volumes during P2V
    • Resizing volumes will increase P2V time significantly because instead of doing a block-level copy the convert would have to use file-level copy
  • Set Target disks to Thin
    • Take advantage of thin provisioning–make sure you have vCenter Alarms setup to alert you when datastores near capacity

Post-P2V

  • Move the Page File to a seperate volume (if it isn’t already)
    • If you are moving away from traditional backup methods to new vStorage methods you can’t exclude the page file from backups typically–however if it’s on a dedicated volume (separate vmdk) you can typically exclude it then
  • Don’t Team NICs
    • You should build redundancy at the vSwitch level and use a single NIC for the VM (having a separate NIC connected to another vSwitch for backups, or Internal/External Interfaces is still ok)
  • Cleanup
    • Get rid of all the extra software/agents physical servers require–Dell OpenManage, HP Insight, Broadcom/Intel Teaming Utilities – If your using Dell Servers use my Cleanup Script to automate the process

« Previous Entries Next Entries »