Oct 5

We needed a fast way to provision 180+ ESXi servers to boot from SD Cards, ESXi 4.1 introduced Scripted Installation to ESXi (the feature has been in ESX classic for awhile now)

However it is limited:

  • Installation on USB Devices (SD cards, flash drives, etc.) isn’t currently supported.

Uhoh, our plan is to use SD Cards in Dell PowerEdge T610s and Dell PowerEdge 29xx (I’ll explain how on the 29xx in a later post) for our installs.  This isn’t good…

We figured we could build a golden image and clone our SD cards from that, but cloning the SD cards proved difficult.  I tried a lot of different apps and nothing seemed to work–we had trouble with DD even.  Then I stumbled across this blog post from Luke: Fast deployment of vSphere ESXi 4.0 running on a 1GB SD-Card

Luke recommended WinImage to do this cloning, I still couldn’t get WinImage to work at first but a quick email to Luke cleared up my troubles (thanks again Luke)

It was good to see my process to create the gold image was similar to how Luke did his just a few minor variations:

Creating the Gold Image

  • Use a spare box for these steps–
  • Install the Dell customized ESXi 4.1 onto the SD Card
    • The Dell customized ESXi isn’t actually required–from what I’ve read it simply updates support links and other textual things to refer to Dells support pages for various things…but whatever.
  • Add the host in vMA so I can install OpenManage 6.3.0
    • OpenManage for ESXi is provided as a VIB and I choose to install via vMA
  • Set root password
  • Configure CIMOEMProvidersEnabled
  • Configure NTP
  • Add your license key–even if it’s ESXi free VMware will provide a license key — otherwise you’ll start the evaluation clock ticking…
  • Create custom roles
    • By default there are only three roles: No access, Read-only, and Administrator
    • I create an additional role, Virtual machine user with basic access to work on VMs (Power on/off, Remote Control, Mount Discs, etc.)
  • Ensure networking is set for DHCP
  • Ensure no datastores exist
  • Shutdown & yank the SD card out of the host
  • Clone to a file using WinImage
  • Clone from a file to a new SD card using WinImage
  • Test
  • Profit $$$
Oct 3

Many folks have blogged about building a home lab–I have an old lab that really draws some power and not really giving me what I’d like.  With that in mind I set out to build a new lab but with the intent of being as cost-effective as possible.  Lots of folks are running T610s and T110s but those draw a lot of power and cost quite a bit more then I’d like.  Others white-box some awesome labs for cheap but they still consume a lot of power.

I came across the HP Micro Servers that seem to be gaining alot of popularity, but opted against them for 2 reasons:

  • They use older generation AMD processors – I can white-box similar functionality with the latest generation processors for less money
  • HP – ’nuff said
So I came across the new AMD E-350 boards and found gold.  These boards are cheap (~$80-$120) and have an integrated dual-core AMD processor (these are the next generation processors from what is in the HP Micro Servers).  The low energy draw is very impressive, it appears you can run one of these with load and they will consume under 40 watts.  I want atleast 2 rigs and was originally set on quad-core or six-core processors but the ultra-low power consumption of these AMD chips changed my mind there.  I can run 3-4 of these for less money and match core counts.  In my experience I typically run out of memory resources way before hitting any CPU contention issues on the system I manage at work.  Remember this is a home lab, you shouldn’t need lots of RAM therefore why have a quad-core or six-core processor if your only going to use 8Gb of RAM in your host?
I ordered these bits last night to try out one and if I like it I’ll order 1 or 2 more setups:
  • Motherboard: ASUS E35M1-M Pro
  • RAM: G.SKILL Ripjaws Series 8GB (2 x 4GB) 240-Pin DDR3 SDRAM DDR3 1333 (PC3 10666) Desktop Memory Model F3-10666CL9D-8GBRL
I have drives, a case and a power supply kicking around already.  I’ll post up some performance metrics once the board arrives.
Sep 24

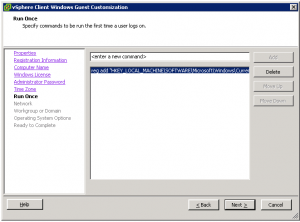
If your not using guest customization specifications, get going now!  Some people ask why do this in a VMware Template when you can do it via Active Directory using Group Policy.  We use our templates a lot for test machines which may or may not end up joined to a domain.  This ensures that no unwanted updates get applied  to these test machines. Works great across Windows XP, Server 2003, Vista, Server 2008 and Windows 7 (might also work on Windows 2000 but I didn’t check).  If you don’t know what guest customization specifications are checkout my other posting explaining all about them and howto create one.

To disable Automatic Windows Updates, all you need to do is add this entry to the RUNONCE area of your customization specification:

It’s that simple!

Sep 3

Most folks with well established vSphere environments don’t have many physical machines left kicking around–but incase you do Converter Standalone 5.0 was released a couple of days ago with some awesome new features:

Preserving the LVM configuration on the source machine during Linux conversions.

Only LVM2 is supported
You have to manually do this during the P2V–Under data to copy, hit the dropdown at the top and select volumes to copy.  Then click the Advanced button and select the destination layout tab.  Pick a disk and click To LVG (Logical-Volume Group)

Enhanced synchronization including options for scheduling synchronization tasks and performing multiple synchronization tasks in a conversion job.

You can schedule the synchronization for a date/time you specify now instead of only being able to synchronize immediately after cloning.

You set these options under the Options page–click the Advanced options button.

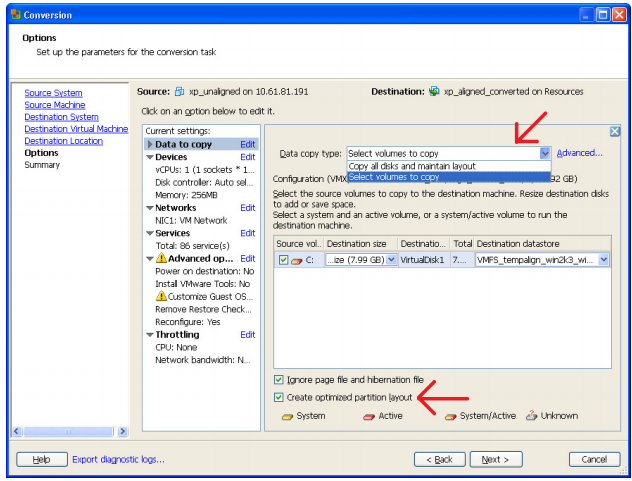
Optimized disk and partition alignment and cluster size change.

When you are doing a P2V check the box shown below to enable the new alignment feature.  If you are tweak happy you can hit the Advanced button, then select the destination layout tab. You will notice you can change the NTFS cluster size as well.

Conversion data is encrypted between the source and the server.

This should make the security folk happy.

Restoring VCB images.

Take note when using this feature the MAC address will be regenerated, important to note if the machine the VCB image is from was running a licensing server.  Some vendors generate license files based on MAC address, since the MAC address will have changed the license server won’t distribute licenses to clients anymore.  (Products leveraging FlexLM/FlexNet Publisher)  Specific Products that come to mind are: AutoCAD & Rosetta Stone.

Read the full release notes here:  http://www.vmware.com/support/converter/doc/conv_sa_50_rel_notes.html#whatsnew

Aug 18

So your trying to import a signed certificate that was created with the certificate signing request (CSR) you get an error in vCenter Orchestrator Configuration about the cert not being the correct format. If your using Microsoft Active Directory Certificate Services here are the exact steps:

  1. Export a certificate signing request from the VMware vCenter Orchestrator Configuration: Server Certificate area (goto http://vco-server:8282 then click Server Certificate on the left).  If this option isn’t displayed select the option to install a self signed certificate and then you will get the option to export a certificate signing request.
  2. Copy and paste the contents of the CSR file you downloaded from vCO Config area to your Cert Server web interface (http://CERTSERVER/certsrv).
  3. Select Web Server from the drop down and submit.
  4. Now ensure DER encoded is selected and download the certificate chain.
  5. Change the file extension on the file you just downloaded from .p7b to .csr
  6. You should now be able to upload it immediately using the “Import certificate signing request signed by CA” option inside the VMware vCenter Orchestrator Configuration: Server Certificate area (again goto http://vco-server:8282 and select Server Certificate on the left)
  7. You get a green bubble by Server Certificate and everything is happy.
Aug 7
VMware Security Advisories
icon1 Michael Requeny | icon2 VMware | icon4 08 7th, 2011| icon3No Comments »

VMware posts security advisories to notify users of any vulnerabilities or other security issues that effect their products.  You can subscribe to be notified via email whenever they post a new advisory.  Keeping on top of these security advisories so you can evaluate each one and understand any risks is important as a VMware Administrator.

These advisories are posted in a couple of places:

Jul 25

So a user account is getting locked out from your vCenter server?  Check the windows security event logs, they typically clearly point out the culprit.  If they are not much help you can start with the common things that are applicable for any server causing account lockouts:

Services

These can be running under the locked out user account

Persistent Drive Mappings

Using the locked out user account credentials

Disconnected TS/RDS Sessions

A process can be running that is using the locked out user credentials

ODBC Connections

Ensure you did not use the user account that is being locked out for an ODBC connection for the vCenter database

Scheduled Tasks

Scheduled task(s) can be setup to run as the locked out user

Once you’ve exhausted all of that…

VMware Specific Areas to Check

vSphere Client

Can be running with out of date credentials and caused the lockout, you can use the sessions area in vCenter to check for active sessions

vCenter Plugins

Guided Consolidation

Uses a specified user account to poll servers to see if they are good candidates for virtualization

Update Manager

Has a proxy configuration area you can define a user account to login to the proxy with

VMware Data Recovery

Data Recovery uses stored credentials to connect to vCenter, ensure the specified user isn’t the one being locked out

NetApp’s Vitual Storage Console

I don’t think there is specifically a place you can have cached credentials in here, but I registered this to my vCenter using my account and it ultimately ended up locking me out about a month later when I changed my password due to expiration

Still Stumped?

Look at any Monitoring Tools (especially trials and free utilities you may have forgotten about) you ever installed on the box that might be running with the locked out user account: Veeam tools, vKernel tools, Vizioncore tools, Quest vFoglight Quick View, etc.  You can always disable services and wait to see if the lockouts continue if you really get stumped.

Jul 1

First please know that vCenter being down does not take your whole vSphere environment down.  It limits you on creating new tasks (like deploying a new VM from template) until vCenter is back up.  When vCenter is down HA/FT continue to function.

Physical or Virtual

vCenter is the heart of VMware’s virtualized infrastructure, but many folks are reluctant to virtualize their vCenter.   Running vCenter as a VM is completely supported by VMware.  You get all kinds of benefits from running vCenter as a Virtual Machine:

  • HA will also protect vCenter in the event the host it is running on goes down
  • You can vMotion vCenter from one host to another for maintenance and other things
  • Prior to upgrading vCenter to a newer version you can snapshot to help with rolling back more easily
  • Best of all–You gain the benefit of virtualizing yet another system and move towards virtualizing 100% of your data center.

If you are thinking about Virtualizing vCenter glance over this page out of the VMware Library:
VMware Online Library: Install vCenter Server in a Virtual Machine

High Availability

First the biggest thing is that you should remember  HA/FT will continue to operate without vCenter–all decisions will be made using a snapshot of what the extra resources were in the cluster prior to vCenter going down.

Lets look at the major things vCenter does:

  • VMware Distributed Resource Scheduler (DRS)
  • VMware High Availability (HA)/Fault Tolerance (FT) – Configuration
  • VMware VMotion + Storage VMotion
  • VMware Update Manager (Guest and Host)

After reviewing those items–does anything stick out that makes you think vCenter needs to be up 24/7?  Would HA be sufficient protection so you only have a small amount of downtime in the event the host running your vCenter VM went down?  I think yes.

Clustered?

You can look into vCenter Server Heartbeat, this is licensed as an addon to vCenter.  vCenter Server Heartbeat is basically an Active/Passive cluster for vCenter that can be setup to run locally or across your WAN.  vCenter Server Heartbeat also has the advantage that it can protect more then just the vCenter, it also protects the addons like vCenter Converter and vCenter Update Manager–even Guided Consolidation can be protected.  It is more costly then just running vCenter as a VM and protecting it with HA but the benefit of having an Active/Passive clustered vCenter + addons across the LAN/WAN may be beneficial for your organization.

Microsoft Cluster Services / Veritas Cluster Services

vCenter can be protected via “third party solutions” such as MSCS or VCS and VMware will support you to some degree but they do not certify these configurations.  If you have an issue VMware may determine the cause to be the third party software and not be of much assistance beyond that…  If you are thinking of going this route read over this VMware KB: Supported vCenter Server high availability options

Jun 24

Disable Screensavers

Disabling the screensaver saves valuable resources, also note that VMware KB 9275881 recommends disabling the Logon Screensaver as well.

You can disable the login screensaver via the registry: “HKEY_USERS\.DEFAULT\Control Panel\Desktop\ScreenSaveActive” should be set to 0

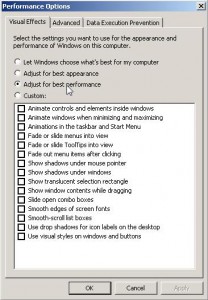
Set Visual Effects for Performance

These are unnecessary effects that waste CPU cycles, things like the fades transitions for windows and shadows under windows.  You can change this setting under Control Panel -> System -> Advanced -> Performance Settings

Disable Indexing

If you don’t need it disable it–you can stop the service to kill it entirely across the whole VM, or on a drive by drive basis by right-clicking and selecting properties.  There is an option to index or not to index the drive.

Make sure VMware Tools is installed/running

This is more for remote control performance, VMware Tools improves the mouse greatly–also make sure you set the Hardware Acceleration to full

Use VMXNET Network Adapters

VMware Tools is a requirement for VMXNET Adapters, they are the best performing network adapters

Uninstall Unnecessary Hardware/Software

If the VM was P2V’d chances are it has things like OpenManage and Broadcom/Intel related software for the old physical NICs.  You should remove this extra software that is no longer necessary.

Also the old network card is likely still installed, you can remove these by running “set devmgr_show_nonpresent_devices=1” at the command-line then going into device manager, select View -> Hidden Devices and you will now see all that old hardware and can right-click and uninstall.


Jun 10

VMware vCenter Mobile Access (vCMA) is a cool fling from VMware Labs. It allows mobile access to your vSphere environment via your vCenter(s).  Setting up vCMA takes very little effort as it is packaged as a virtual appliance.  You simply download vCMA as an OVF, deploy the OVF Template, and power on vCMA.  Once powered on, config the network and your ready to go.  Note that vCMA does not use a service account or static connector to vCenter, each user will login to vCenter via vCMA with their own credentials–think of vCMA as a web-based version of the vSphere  Client.

Read the rest of this entry »

« Previous Entries Next Entries »