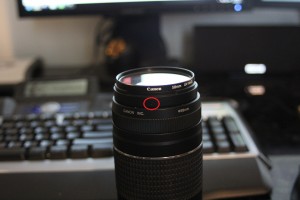
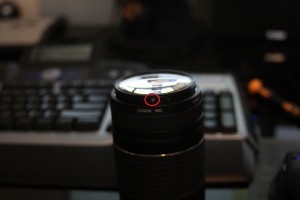
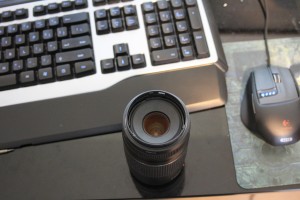
Dust behind your front lens element? Â Not to worry–disassembly is easy:
Remove the 3 black phillips screws around the front edge:
You can now lift that front ring off the rest of the lens.
Don’t bother trying to unscrew these next 3 phillips head “screws” they are pins that you’ll need to remove with some small needle nose pliers. Â Pull them straight out, they come out very easy.
Now carefully tip the lens over being careful not to let the front lens element fall out, if it doesn’t fall out easily gentle tap and shake the lens a bit and it should fall right out.
This is what the inside of the lens looks like
Now you can clean the dust off the back of the front lens element, reassemble by reversing the disassembly process.


April 20th, 2011 at 10:36 pm
This article was so helpful. I kept trying to unscrew the 3 little phillips head screws to no avail. Your instructions did the trick and I was able to get the inner lense cleaned.
Thanks.
April 22nd, 2011 at 4:42 pm
Glad to help
May 31st, 2011 at 9:20 am
Wish I had seen this before buying the second lens, yep going to clean both tonight – thank you for the know-how.
btw – it is a good lens and suits my swan photographs very nicely across the water, with a little clean maybe just maybe I shall be back to taking some totally stunning shots with my EOS550D and the 75-300mm lens (x2), thanks again xx
May 31st, 2011 at 9:42 am
You can always sell that 2nd lens on Amazon 🙂
July 10th, 2011 at 10:45 pm
Oh man, you saved my life, I bought this lens used with an Eos 620 (awesome camera by the way), and another lens and I wanted to shoot an air show with it and my 50D and got so disappointed when I looked at the pictures and the dust specs all over them. I followed your instructions and got it cleaned like new, thanks a lot!
July 10th, 2011 at 11:01 pm
Always good to to hear someone was able to breath new life into an old lens.
August 10th, 2011 at 5:54 pm
Fantastic, it took less then 10 mins to disassemble clean and put back together. returning my 10 y.o. lens to like new for use on my new 600D. Nearly took it in and paid for a repair YESTERDAY. Love the internet Love your site
August 16th, 2011 at 8:41 am
Glad to hear it!
August 20th, 2011 at 10:24 am
Nice tip, dude! I was stuck on these 3 “screws”. But now I need to disassemble the front group. The dust and fungus is inside the two frontal lenses, and they are locked together…
August 20th, 2011 at 1:14 pm
I haven’t had the need to go that far yet–sorry!
December 20th, 2011 at 8:38 am
There’s a ribbon cable dangling deep inside the optics of my canon EF 75-300 f4-5.6 III USM. Any idea how to dissemble and repair?
January 2nd, 2012 at 4:24 pm
Yikes, I’m willing to bet that cable is cut, the connectors for the ribbon cables aren’t easy to slide apart normally…
Follow the guide I posted for the first bit, after that your on your own. Under the motor is a bunch of gears for AF that I don’t think are going to be very easy to reassemble…Not sure if the whole thing falls apart once you crack it open or what…
Look at these pictures, they might help:
http://gallery.clubsnap.com/showgallery.php/ppuser/23585/cat/500
February 10th, 2012 at 1:20 pm
Thanks Michael… Knowing that the three silver screws were actually pins was a big help!!
February 25th, 2012 at 6:59 pm
Glad to help!
February 24th, 2012 at 7:00 pm
Had a mishap at TAFE the other night (Diploma of Photography). Didn’t zip up the camera bag properly, and the lens rolled out and dropped on the floor. I didn’t think it had been damaged, but when I checked later, the UV filter had been smashed and the filter thread of the lens had been bent out of shape. Some of the glass fragments ended up behind the front lens element. Thought I was up for an expensive repair because I couldn’t find how to get the pins out. Mine were tight – I had to prise them out with a small screwdriver, and I wouldn’t even have tried that if not for your article. Blew all the glass fragments out with compressed air, and the lens is back to “as new”.
Another tip for others – the filter thread on the lens was damaged, but the thread on the UV filter ring was OK. I cleaned out the glass from the filter ring, discarded the snap ring that holds the glass in place, and forced it back into the lens filter thread. That gave me a clean thread to screw the replacement UV filter into.
Thanks again,
Richard C.
Sydney, Aus.
February 25th, 2012 at 7:00 pm
Richard, thanks for the comment. Excellent idea reusing the filter’s thread ring to get new clean threads.
March 4th, 2012 at 7:07 pm
Question: another website instructed to fully extend the lens before taking the front lens off. Is this necessary? Thanks!
March 4th, 2012 at 8:45 pm
This was not necessary for me.
March 31st, 2012 at 5:48 am
Very helpful page – thanks. I will just add that the same advice applies to the original Mk I version (and presumably the Mk II and USM versions too). For me the pins needed a fair amount of force and I found it helpful to tweak them slightly with a screwdriver first.
I also found that inserting a small flat-headed screwdriver blade into the apertures where the front ring screws were helped to loosen the front element. You’d have to be very careful to only insert it a very small distance though, otherwise you could probably scratch the glass. But mine wasn’t budging until I tried this.
I agree that the position of the zoom and focus controls appears irrelevant to the operation.
Great lens, by the way…there is a lot of rubbish all over the web written by people who just bought more expensive lenses. My brother has shot magazine front cover shots with his.
March 31st, 2012 at 10:45 am
Thanks for the feedback & extra tips Mike!
May 9th, 2012 at 5:03 pm
OUTSTANDING!!!
You saved me some money and satisfied my inner handyman
May 12th, 2012 at 4:32 pm
Glad to hear!
May 23rd, 2012 at 10:34 am
Thank you very much for your uncompromised help. Following your profesional guide and tips made the cleaning easy. The lens looks clean and as I took some sample shots they came out with flying colors compared to what I had before. A 75-300 USM Zoom lens is back in bussiness Thanks to you !!!!
May 27th, 2012 at 9:45 pm
Always good to hear!
June 16th, 2012 at 6:03 pm
Hi !
It’s been a long time I was trying to open it !
You’re the man ! Thank you very much from Martinique French west indies !
Keep going !
June 16th, 2012 at 6:12 pm
Glad to help 😉
August 10th, 2012 at 2:12 pm
Hi!
Thanks for this guide! The 3 inner “screws” description helped me a lot of! Thank you again!
August 28th, 2012 at 11:52 am
great advice but i must add a word of warning…. once undone if the lens looks greasy the grease could be in between the two bits of lens,which was news to me as i thought the lens would be one piece of glass not two…so my warning is once apart do not sumberge in soapy water as that causes major drama’s…gutted as i thought after reading and following this my lens would be minty again not as greasy as a grease monkey starring in the film Grease lol
August 29th, 2012 at 4:49 pm
Woah Tim, sorry to hear that, thanks for posting this tip for others to see though!
December 22nd, 2012 at 7:56 am
Dude, thank you very much. It was fantastic.
But I have a real situation here and I need to gofurther to remove the fungus from the intenal lenses.
I´ll keep looking forward.
DAO
January 20th, 2013 at 8:25 pm
Dear Ambrozio: remove fungus sounds pretty hard to do; in my experience it might call for an optics expert to clean AND AVOID reapearance… long time ago one of my teachers told me fungus in lenses were in retret as the body, glue and cristals had got better quality.
February 3rd, 2013 at 10:50 am
thanks for taking time to put this up
February 13th, 2013 at 4:29 pm
I was pulling what little hair I had OUT! I couldn’t unscrew those 3 little “screws” underneath the main ring. Haven’t tried needle nose pliers yet, but now I will. I ended up getting pieces of plastic inside the lens as I was using a plastic knife around the edge to try and force the cover off. Going to re-attempt now. Thanks for the valuable info.
April 11th, 2013 at 3:09 pm
Juan,
It’s really silly that they use those screw heads on those pins! I tried something similar out of frustration before I discovered that!
February 17th, 2013 at 12:27 am
Like all the other comments, THANKS…… I have two 75-300mm, the old one has the ‘fungus’ growth and the new one (6 years old) has the ‘Error 99’ so I was in a spot of bother until I read your site. I quickly swapped the new lens into the old one and I am back in action (without any expensive repair/replacement). Thanks again for your site, it has meant a lot to me. Cheers, mate.
April 11th, 2013 at 3:09 pm
Max,
Awesome — pretty cool you could swap parts between 2 to get a working lense!
March 14th, 2013 at 2:20 pm
thanks for the info, i was able to pop the first glass out and clean it up. I still have a a spec of fuzz so gonna have to figure out how to get deeper into my lens.
April 11th, 2013 at 3:08 pm
Adam,
Sorry to hear that — every few months I ponder picking up broken lenses off eBay just to do deeper dis-assembly write ups
August 7th, 2013 at 4:27 am
Thanks for the tip, I had to lever the lens out via the pin holes as it was quite tight. I noticed a little piece of felt on the inside of the plastic end cover, It covers the air hole between the lens & the barrel, I think it is an air filter for when the barrel is extended to zoom & focus & so should be repositioned to line up with the air hole when reassembled.
September 29th, 2013 at 10:33 pm
Adam,
I am looking to repair my 75-300 USM mark 1. an errant soccer ball knocked it out of my hand just as I was taking it off my camera. It broke the ring right at one of those pins. Do you know where I might get one of the rings?
October 7th, 2013 at 10:10 am
Not sure where to source only the ring,
You can try to find a broken lens on eBay and salvage the ring–double check none of the glass elements are broken on your lens if you are going to do that.
October 14th, 2013 at 10:23 am
Thanks Michael – so useful. I needed to clean the inside of the outer lens to remove mould/fungus. Reassembled ok but then noticed the same problem on the inside of the rearmost lens by the mounting.
Going in from the rear looks scary, can I access from the front?
October 25th, 2013 at 2:15 pm
Bob, I haven’t done a cleaning myself that deep but I have gone in from the rear — see my other post to see if it changes your mind:
http://michael.requeny.com/2011/03/19/canon-zoom-lens-ef-75-300mm-f4-5-6-iii-disassemblyrepair-stuck-zoom-barrel/
October 15th, 2013 at 12:52 pm
Thanks for this, I was thinking I was going to have to buy a new lense as there was dust and sand (?!) behind the lens. Thanks to you my lens in now clean and zooming smoothly again. I had been quoted £98 to take the lens in for cleaning!
October 25th, 2013 at 2:14 pm
Glad to hear!
November 11th, 2013 at 6:39 pm
I bought a new camera and got this lens as part of the deal, though I already have a better piece of glass at that mm range…. But the lens I got had some dust under the front lens. Now thanks to you and your ever so helpful steps I can sell this lens to someone that will actually use it, without having to explain the few dusties 🙂
THANK YOU!!!!
December 12th, 2013 at 3:58 pm
Thanks so much, just got a used one for my daughter’s camera and wanted to remove the three or so dust motes. About CDN $120 with 90 day warranty. Nice lens, almost the same as my 70-300 IS USM
February 18th, 2014 at 1:56 pm
Any advice on getting those first three screws to budge? I’m using a #000 phillips and I know not to force them.
I can’t get them started. Is Liquid Wrench an option?
February 18th, 2014 at 2:46 pm
I found the answer! I used an ice cube in a baggie, applied it to the screw for 30 secs at a time, started the screw with firm pressure. Also cradled the lens in an open book.
Thanks for this post, looking forward to cleaning behind the front lens.
May 23rd, 2014 at 12:37 pm
Cool tip! (no pun intended)
February 24th, 2014 at 8:50 am
any advice on removing the front element on a Canon F2.8 70-200 L (scratched)? it is an old lens and the likely cost of a professional repair would be uneconomical
May 23rd, 2014 at 12:36 pm
No, sorry. If you decide to be adventurous and get it done, please document it for the rest of us. If you don’t have a site to post it on you can post it here.
April 10th, 2014 at 7:29 am
Those 3 screws were killing me. THE ones that should be pulled.
Thanks!
May 23rd, 2014 at 12:35 pm
No problem 🙂
April 10th, 2015 at 8:22 pm
Hi! I am very happy I stumbled across this page! I was struggling and ended up stripping out the “screws” in an attempt to remove the front lens element. After I read this, I grabbed a pliers and voila! My lens didn’t want to come out easily, so I had to find a suction cup and grab it that way. I’ve been doing photography for a while and just recently got a DSLR and started a business, so disassembly is quite new to me.
Thank you!
November 4th, 2018 at 4:53 pm
This worked great. ten minutes and everything was back together and clean. Remove the first 3 black screws and take off the ring. Find the 3 silver “screws” and just pull them out with pliers like the article says. I used a paper clip unfolded to push the lens out with the holes the silver screw pins leave.