So you want to setup a card access system? Well assuming you don’t mind being locked out of your home for a few hours here is how it’s done…
First let’s cover how they work—
There are five parts to a card access system:
- Control Interface
- Cards
- Readers (Either card readers, keypads, or a combination of both)
- Card Access Control Panel(s)
- Outputs (electromagnetic locks, electric strikes, contacts)
The Control Interface lets you add/delete cards, delegate access, define time schedules, configure hardware, monitor events.
The Cards identify the owner—there are very technologies these cards can be, MagStripe, Wiegand, 125kHz Prox and some other proprietary stuff.
The Readers must be compatible with the type of card you choose—usually the readers only talk to one type of card. The readers are “dumb” they have no information on any access privileges nor do they tell a lock to unlock (sorry to break your hearts Hollywood movie criminals)
The Card Access Control Panel receives data from readers, they are the only part of the system that have the information on access privileges, the panels energize relays to unlock doors. When a panel receives information from a reader many things are checked—is the card known? Is the card within a valid date/time range for usage? Does it have access to whatever output is controlled by the reader sending it’s data?
The Outputs are whatever mechanism you are going to use to unlock your door. There are a variety of things you can put on the outputs—I use a set of contacts on my garage door opener to open my garage. I plan to use an electric strike plate on my front door at a later date. If I had a cabinet in my garage I wanted to secure I would use a small electromagnetic lock.
Know that you have an understanding of the system lets do the deep dive into how it all goes together. This write up is vendor specific using mainly Northern Computers 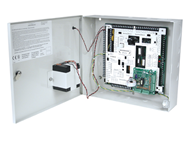 components but the basic principles of the system/wiring/etc. is the same no matter the manufacture you decide to use. This information is things I’ve picked up just fooling around with this stuff, I’ve never implemented or designed a system other than my house and some friend’s homes so don’t try anything based on these instructions.
Card Access Panel
We will start with the core if the system which is your card access (CA) panel. I prefer Northern Computers (they are a part of Honeywell) panels because they are typically readily available on eBay, craigslist, etc. I choose an N-1000-II–this panel supports 2 card readers and 4 relay outputs (and a bunch of contacts since you can use this panel as an alarm panel too but this guide won’t go into that…) So really just focusing on the fact that this panel can provide card access to two different doors.
Power Supply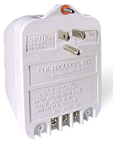
You need to power this CA panel, below are the power requirements
- The N-1000-II requires a 12 VAC, 40 VA, 60 HZ or 12 VDC linear (2 amp continuous) power supply.
- The N-1000-III/IV requires a 16.5 VAC, 50 VA, 60 HZ or 12 VDC linear (2 amp continuous) power supply.
 Battery Backup
Many panels have batteries built into their cabinets to provide power to the panel in the event of power loss. Think of it as a built in UPS for your CA panel. If you bought the panel used off eBay spend the extra bucks and buy new batteries for it to ensure you can use your system in the event of power loss. To maintain the maximum back-up time, you should replace the battery every 2-4 years–2 years if you are going to use the panel in high temperatures (like a garage in South Florida). The picture to the right shows a battery mounted on a cabinet door for a CA panel.
- N-1000-II uses a 8 VDC (4 amp/hr.) battery that provides about three hours of full operational backup if the battery is in good shape.
- N-1000-III/IV uses a 12 VDC (4 amp/hr.) battery that provides about four hours of full operational backup if the battery is in good shape.
Communication Bus
Now that you have your panel picked out you need to figure out how to communicate with it, the N-1000-II has a number of methods, the comm bus is 20mA current loop. I used a Northern Computers C100A 20MA serial loop converter–It is a communication interface from your PC/Modem to N1000 panels. This requires a power supply as well, a 12VAC power supply at that–the N-1000-II also needs 12VAC–Now if you can get a large enough power supply you will be able to wire both your CA panel into it and the serial converter.
Your other options are a Northern Computers network adapter that is basically a serial server as far as I know, priced at about $200 on eBay.
If you purchase a N-1000-III or N-1000-IV you use the N-485-PCI-2 adapter, this is an RS485 to serial adapter for PC connections only.
I used an off the shelf serial server attached to my C100A so I can program from the comfort of my desk. This is recommended so you don’t have to take a laptop over to your panel to make changes (adding/removing keyfobs/cards)
Outputs (Doors you want to control)
With all your panel stuff sorted out decide what do you want do you want to control access to with your panel–Garage Door, Exterior Door, Interior Door, Kitchen Cabinet? These all basically are controlled the same way, just the lock mechanism is different depending on the door.
Garage Doors
The garage door is usually the easiest to do because 99% of openers simply connect two wires momentarily to operate the door. We can wire this directly into the CA panel and leaving the garage door’s existing open/close button intact also having a card access to the garage door with no other parts.
Electric Strikes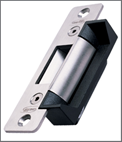
Electric strikes replace the strike plate in the door frame. There are two main types, Fail-Safe and Fail-Secure. Fail-Safe strikes usually require power 24/7 to keep them locked, when power is lost they unlock for safety. Fail-Secure strikes stay locked until they are energized, and are what I would use. Remember–the door handle still works, you can always exit in the event of an emergency by using the handle of the door as long as the lock is unlocked (I don’t think this is a problem in homes because you are exiting to the outside and you can unlock the door if it’s locked)
Strikes are available in AC or DC power requirements, the AC units are the kind that buzz when you energize them so I wouldn’t recommend them for a home. The DC units are silent except for maybe a click when they change state (energized/de-energized). You may have heard this buzzing at convenience stores in shady parts of town…
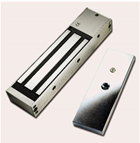 Electromagnetic Locks
Many commercial buildings have interior doors that close during a fire alarm–these work with automatic door closer and a magnetic hold open device. These magnetic locks are just much much stronger versions and instead of holding a door open they hold them locked. There are many different sizes, smaller ones that you can use on a kitchen cabinet, display case, or file cabinet and larger ones for various size doors. These require constant power to remain locked, when power is lost they will unlock unless you have battery backup in your power supply.
Card Readers
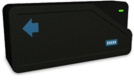
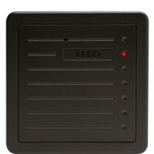 Proximity Readers
These are the most popular now ‘adays many of you likely use these at work, and see the HID logo on your badge and readers. HID is the biggest manufacture of these readers and many other company’s simply rebrand HID readers and market them under their name. There are like hundreds of designs and you typically need to use the same reader as the manufacture of the cards you want to use. I use HID readers with: Duo-Prox cards, ProxProII cards, and Prox Keyfobs. I feel these are the only kind of readers that should be used in the home due to the fact you can use a card or a keyfob. You can even use active transponders that you put in your car so your panel will open a gate or garage when the vehicle is close enough (these have like 20-30ft range) however that kind of install is outside of the scope of this guide so have fun with that…
Swipe Card Readers
 Security professionals will smite me for placing all these in one category but I feel they are all the same. Swipe Card Readers use a variety different technologies, from Magstripe, Barcode, and some other stuff I know far to little to talk about. These are prone to failure
more easily in my opinion–everyone I know has demagnetized a hotel key card accidentally at least one time in their life… and Barcodes can scratch off or with regular wear be difficult to scan. For these reasons I don’t recommend these types of readers. However there is one more type of swipe reader called Wiegand. Wiegand cards are very similar to mag-stripe except they have magnetic wires embedded into the card. These make them much more durable than any other kind of swipe card.
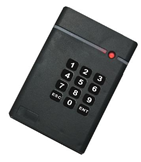 Keypads
You can forgo the card readers all together and simply use keypads. These take more time and are less convenient then a card reader but they are good for a backup in case you lose your card. Many keypads are available that are also card readers so you only need to moun
t a single unit to have both readers. You can also program the panel to require both the keypad with correct code entry and having the user read a card to unlock a door to be really 007.
Biometrics
Fingerprint, and Hand Geometry are the most popular, I haven’t seen anything like a iris or retina reader before. I’ve seen software for voice analyzing but never a hardware solution that can be integrated into a access control system.
Key Readers
I don’t know much about them, I believe they are all using Dallas iButton (1-Wire technology oh ya!) readers/buttons. These use a button key to be inserted into the reader momentarily. Don’t worry about the elements, these keys/buttons are sealed, and are mounted on a flat plastic strip with a hole to go on your key ring.
SmartCard Readers
These are out of my price range so I haven’t toyed with it at all. The readers I’ve seen are all contact less so don’t think about using that fedex kinkos card to open a door–yet…
Install
Now that you have a grasp on all this you can proceed to install, there are a few things you need to be aware of with the install though:
- Run all wiring for inductive loads (door locks/strikes) and panel primary power apart from each other–I ran the power supply for the panel in from the left side and all output wiring straight out the top.
- Use shielded cables or metal conduit on data cables to reduce interference.
- Do not mount the power supplies, modem, or external relays inside the N-1000-II enclosure.
- Do not “string” wire across the face of the N-1000-II panel.
- Do not use the same power supply for both locks and control panel or locks and readers.
- Do not mount the control panel in or near an area that has electric noise (e.g., next to a large electric motor or power transformer).
Panel/Comm Interface
- Mount the CA Panel Cabinet in a location close to an outlet that can be used 24/7 (not to be unplugged to charge your drill or something if you do this in the garage)
- Mount whatever comm interface you have next, I stuck mine right next to my CA cabinet because I plan to use a serial server, not programming the panel using a pc connected directly to the panel. If you do not use a serial server you can extend the cables on your comm interface, refer to the manual for the maximum cable length.
- Wire up the comm interface into the panel–this was 4 wires, refer to the manual of the comm interface for a diagram.
- Attach your cabinet ground to your house ground. I used a conduit ground clamp because in my garage the conduit is exposed.
- Wire in your power supply to the comm interface and panel–depending on your comm interface/panel you may be able to use one power supply for both–read your panel and comm interface manual to see if this applies to you.
- Connect the battery on the door of your cabinet to your panel, ensure the 3V coin battery is also installed in your panel. This battery is just like the one on your PC’s motherboard to save the BIOS info on your PC, this saves the programming of your panel in the event of extended power loss.
- Plug in the power supply(s) for the CA panel and comm interface
- Plug the serial cable into a PC and test the comm interface out using HyperTerminal to test the panel and comm interface now that it’s on the wall. Refer back to the testing section for this.
Card Readers (CRs)
Following the instructions that came with your card reader mount it where you want, ADA requires that the reader be at a height of 54″
Outputs
If you are using any inductive load’s on the outputs you MUST use a S-4 Suppressor Kit, one on the panel and one at load. Polarity doesn’t matter with the S-4 suppressors just wire them in.

S-4 Suppressor Kit Installation
Do not use the panel/comm interface/reader power supply(s) to also power locks or loads. This will break your shit.
You should keep the relay output wires and any other wires separated (don’t zip tie them together or run them parallel to each other unless they are at least 12″ apart—this is what Honeywell says…)
I haven’t installed an electric strike on my home system yet but will soon.
Programming the Panel
Now the fun begins, fire up HyperTerminal and connect to your C-100-A1, using the baud rate set on the dip switches on the CA panel.
Remember to prefix EVERY command with a space. This is why the manual has _ before every command so you know to hit spacebar! I didn’t read that part and banged my head against the wall for awhile when I first got my panel…
Initialize the panel
I believe this is the command that resets and clears everything—I didn’t have to use this as my panel was wiped when I received it.
“_I=1_R”
Set Buffer/Print Options
We want verbose output, we need to see all activity on the panel so we can know a card is read properly among other things
“_M=1_L”
Panel 1 will buffer and now outputs all activity
Time & Date
Setting the time and date for accurate logging of events.
Set Time:
“_T=1_hh:mm”
Set Date:
“_D=1_mm/dd_day”
Day = 1-7, 1=Monday, 2=Tuesday, 3=Wednesday, 4=Thursday, 5=Friday, 6=Saturday, 7=Sunday. Consult manual if you are setting this in a leap year…
Set Format
This is how the panel will interperate card data. I used:
“_F=pn_1_26_S_1_D_1_B1_B2_B3_B4”
This is for CR-1 Wiegand Card Swipe Reader—but it worked for my HID Prox readers…consult the manual for other types of cards
Assign Names
You can set names to Panels, and Outputs. This makes understanding the output of your panel much easier. (12 characters max)
Name your panel:
“_N=1_R_0_GARAGEPANEL”
Name your output:
“_N=1_O_1_GARAGEDOOR”
Add codes (cards/keycodes)
It’s time to program your cards/keycodes into the CA panel. I usually just swipe the card to make sure the reader sees it and watch the output in HyperTerminal—this ensures the card works.
“_C=1_card#_1_1_2”
Assign CR to O’s
Finally you program what CR activates what O
“_A=1_1_O_1”
Now go test, you should see your output energize when you use your card. Now the thoughts come into your mind to have more outputs and readers…
Controlling more doors
So you maxed out your panel and are craving more control, the great thing about these panels is they can be linked together very easily, but read below to ensure you do it right…
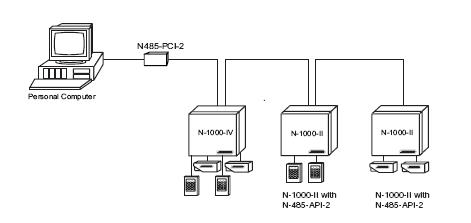
N-1000-IV and two N-1000-II in a multi-drop configuration
N-1000-II
Now if in the future you decide to make more doors card access you can simply connect another panel into the first using the comm bus that communicates via a 20mA current loop. If you want to mix in N-1000-III or N-1000-IV panels you need to use the Northern Computers N-485-API-2 (Access Control Panel Interface) which provides an RS485 communications interface to your existing N-1000-II. The N-485-API-2 interface converts the 20mA current loop supplied by the N-1000-II to an RS485 signal. N-1000-III & N-1000-IV panels communicate using RS485 not the 20ma current loop on the N-1000-II.
N-1000-III & N-1000-IV
You should use more N-1000-III or N-1000-IV panels, there is a door expander panel available for the N-1000-IV that I don’t know the part # for off the top of my head…
Commercial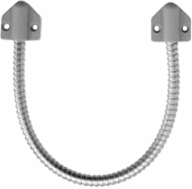
In the event you decide you want to do this in your office or something here are a few things to be aware of that don’t typically apply to homes.
Power Transfer Devices
If you use electric panic bars, or other kinds of commercial electric locks you may need to use a power transfer device to get power inside of the door. These are the different kinds of parts you can use. One is a door cord and the other is a transfer hinge.![]()
Code
I’m told NFPA requires card readers be mounted at a height between 40 and 48 inches from the floor. There is an ADA requirement as well but I would think NFPA is stricter and would be within the ADA requirements.
REX (Request to Exit)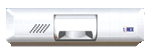
REX is either a button or a motion sensor–think about when you exit a grocery store the doors automatically slide apart to let you exit because a motion sensor detects your presence. This is an example of a REX motion sensor. Many stores and warehouses on their emergency exit doors have REX panic bars coupled with and magnetic locks–the ones that say do not open alarm will sound. These will not unlock immediately when pressed, instead you trigger the alarm and then you have to hold the panic bar pressed in for 15 seconds before the door will will unlock. This prevents a shoplifter from making a quick get-away, (NFPA requires that they open in either 15 or 30 seconds depending on the area I’m told.) Examples of REX devices to the right are PIR (like a motion sensor, and buttons)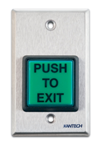

May 30th, 2010 at 11:58 pm
I must disagree with your assessment of swipe card readers. Hotel key cards are usually in the range of 300-600 oersted and are easily erased with common magnets (most can even be erased with the magnetised tip of a screwdriver). However magnetic stripe cards used for access control are in the range of 2750-4000 oersted and are not easily erased or altered with commonly available magnets (except for some very strong rare earth/Sm Co or NdFeB). Barcode cards are constructed with the barcode laminated inside the card with a black mask over it (to prevent copying and counterfeiting) and are thus not susceptible to quick wear.
June 26th, 2010 at 8:47 am
Thanks for the pointing this out, I had no idea that magnetic stripe cards for access control are more resilient to magnets.
October 19th, 2010 at 5:30 am
the motion sensor that we use at home uses infrared beams and photocells:*;
January 19th, 2011 at 9:15 am
I am really thankful to this topic because it really gives up to date information *–
August 24th, 2017 at 1:02 pm
Good tip about using Honeywell S-4 Suppressors across lock relays and locks themselves. Can’t tell you the number of times I’ve had people report mag locks being slow to unlock only to find there’s no place for the power keeping the mag lock in operation to drain-off after the lock relay opens (except maybe sparking across the opening relay points).